| |
|
|
.
What limitations are there on the evaluation copy?
The evaluation copy is fully functional with the exception that you are limited to 30 schedule records
(where each record represents 1 entire day of appointments for 1 scheduled resource).
(Back to Top)
|
|
|
|
.
What are the system requirements for E·Z Schedule?
E·Z Schedule will run on Windows 98/2000/NT/ME/XP and Windows 7+. It requires about 15 megabytes of disk
space to install.
(Back to Top)
|
|
|
|
.
Can I import Client data from my current files?
If you use Intuit's ProSeries or Lacerte tax preparation software, there are specific import routines to load your individual
Client database.
For others, there are generic import routines that will let you map any standard dBase, CSV or text file into the E·Z Schedule
Client database. If you have special needs regarding Client data migration, please
contact our support team.
(Back to Top)
|
|
|
|
.
Can I schedule physical resources?
You can add physical resources (e.g., conference room, exam rooms, meeting rooms, etc.)
and group them for easy schedule management.
(Back to Top)
|
|
|
|
.
Can I customize Client database fields?
You can suppress the display of spouse information. Additionally, you can configure the program to use the
spouse First-Name, Last-Name, Date-of-Birth and the E-Mail fields as capture points for your specific data
(e.g., chart number, litigation type, etc. See the system help file for more information on simple field replacement.
For more extensive customization of your Client database where you can add a second data tab to your
Client edit screen
and up-to 15 custom data fields.
Click
here
for more information custom Client fields.
(Back to Top)
|
|
|
|
.
Can I customize Client appointment fields?
You have the ability to define up-to ten (10) custom data fields that can be stored for each appointment.
These fields can be text, numerical, date or multiple-choice type data. The defined fields can be later
be manipulated and displayed in custom reports developed to your specification.
Typical fields might include fees, collections and type of payment. Typical reports could detail or
summarize daily revenue and collections activity. Click
here
for more information custom appointment fields.
(Back to Top)
|
|
|
|
.
How do I install E-Z Schedule on my network?
Network installation is simple! Click
here
for network installation instructions.
(Back to Top)
|
|
|
|
.
What do I do when I get a "User Logins Already at Maximum!" message?
Based on your license level, you may have 5, 10, 15, 25, 50 or 100
users accessing E-Z Schedule concurrently. User access is
managed by the application via an internal table. In rare
instances, this table becomes corrupt (perhaps due to an inadvertant
power failure) and authorized access is limited in error. To
reset this internal table, access the system In Session Key Combinations dialog either by applying keyboard combination
[Ctrl-Alt-Shift-?] or by Right-Clicking and Left-Clicking the Time
Period heading and clicking Reset
Active User Control File on the second screen.
All other users need to logout of E-Z Schedule in order to
reset the file. When this option is selected, E-Z Schedule will
restart and re-create a new control file allowing correct user
access.
(Back to Top)
|
|
|
|
.
How do I get technical support?
Your purchase of E·Z Schedule entitles you of 60 days free technical support. Just
contact our support team.
Click
here
to purchase or renew your technical support subscription through a secure link to PayPal Payment Services.
(Back to Top)
|
|
|
|
.
Can I have E·Z Schedule customized to my specific needs?
E·Z Schedule is very flexible in its configuration. If however, you need a specific feature not available in the program,
customization is available at hourly rates. Custom modules can be developed to your specification and linked to your E-Z Schedule
Print or File Menus via simple configuration statements (Click here to download a demonstration).
For more information regarding customization services, please
contact our support team for details.
Click here to submit a payment
for program customization.
(Back to Top)
|
|
|
|
.
Where and when can I get updates for new features?
With the release of E·Z Schedule Version 2, all system updates
and enhancements are managed using your connection to the internet.
Check this site regularly for news regarding recent enhancements. Updating is an administrative privilage and can be initiated via the system "Help" menu. Additionally,
you may download a system installer/updater via the links above.
We welcome suggestions from our user base and requests for new features
are constantly being reviewed and implemented to make E·Z Schedule as
efficient and full-featured as possible.
(Back to Top)
|
|
|
|
.
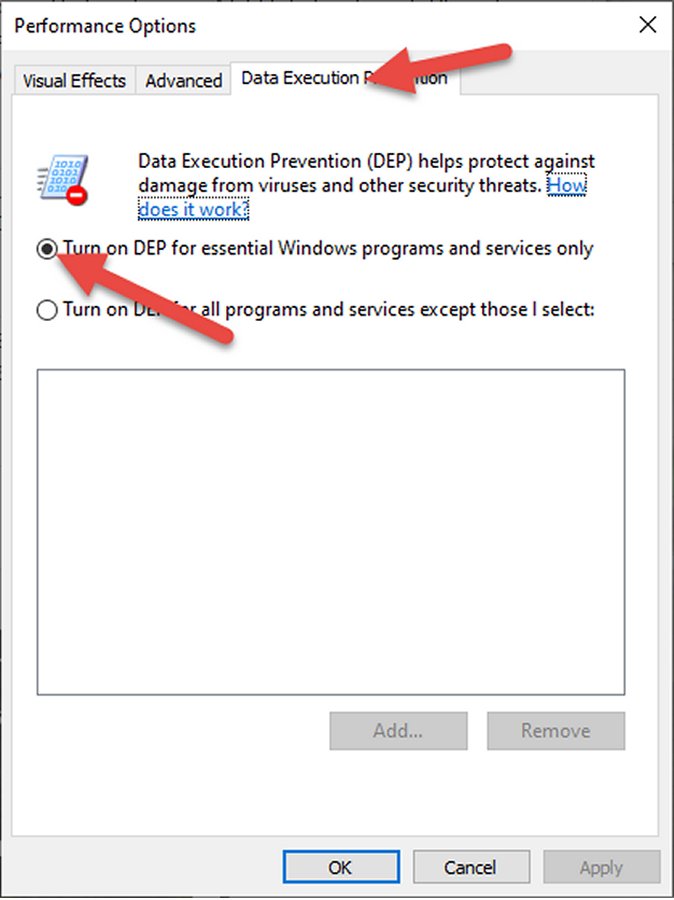
Why won't E-Z Schedule start on my Windows Workstation?
Check your Advanced System Settings.
By default, DEP is only turned on for essential Windows operating system programs and services.
If your System Administrator has configured "Turn on DEP for all programs and services except
those I select.", you must manually add E-Z Schedule to the DEP exception list.
Here's how to do it:
- Enter "Advanced" on the Windows search bar.
- Under "Best Matches", Select "View
advanced system settings".
- In the "System Properties" dialog, in the "Performance"
section, click the "Settings" button.
- In the "Performance Options" dialog, left-click the
"Data Execution Prevention" tab.
- For most Windows configurations, it is recommended to use the "Turn
on DEP for essential Windows programs and services only"
setting. If you need to use the alternate setting, left-click the "Add" button, navigate to the E-Z Schedule program folder and double-click
eszched.exe. This will add E-Z Schedule to the list of programs you want excluded from DEP.
- Click "OK" to save/apply your new DEP settings.
- Reboot your workstation and try launching E-Z Schedule again.

Click
here
here to view additional information from Microsoft's site.
(Back to Top)
|
|
|
|
.
Vista, Windows 7+ and Server 2008+ Issues
With the advent of Windows Vista and Windows 7+, Microsoft introduced
a new network protocol (SMB2) to optimize file sharing for WAN and
low bandwidth and high latency scenarios. To optimize these types of
file access scenarios, Microsoft performed design decisions which
lead to the inability of the new SMB2 protocol to handle cache
coherency of file meta information such as the file size, the last
update time and whether the file actually exists on the server
("file not found" status).
As a result of this design decision made by Microsoft, the SMB2
protocol with its default configuration breaks any application like
E-Z Schedule that relies on shared, concurrent data access. It is
therefore absolutely required to reconfigure the SMB2 cache of the
local workstation to not cache file meta information.
You may download an MSI installation package which reconfigures the
SMB2 cache accordingly via
this link. This MSI package needs to be executed
on any Vista and Windows 7+ workstation running E-Z Schedule in a
network to ensure that no data loss or data corruption occurs when
accessing files concurrently. The MSI is applicable to Vista
and higher operating systems; installation is denied on other
machines.
The package creates and modifies values under following registry
key:
HKEY_LOCAL_MACHINE\System\CurrentControlSet\Services\LanmanWorkstation\Parameters
The following registry values are created and set to zero:
FileInfoCacheLifetime
FileNotFoundCacheLifetime
DirectoryCacheLifetime
Again, you can Run or Save the MSI Installer from
this link.
November 15, 2013: The latest release of E-Z Schedule
will automatically re-configure your Vista, Windows 7+ workstations
to fall back to the SMB1 protocol. If you are unsure as to whether
the registry values have been set, use system tool regedit.exe via
the RUN facility and navigate to the above key for a visual
verification.
Additional Resource Links:
•
Petri IT Knowledgebase: How to Disable SMB 2.0 on Windows Vista/2008
•
Lyle Epstein’s Blog: Disable SMB 2.0 on Windows Server 2008
•
Microsoft Developer's Network: SMB2 Registry Settings
(Back to Top)
|
|
|
|
.
How do I disable those nagging “Publisher Could Not Be Verified" messages?
Disable the message from appearing warning you that “The Publisher Could
Not Be Verified” when you run E-Z Schedule as follows:
- Open the Control Panel and double-click Internet Options (You can also
get to Internet options from Internet Explorer's
Tool dropdown or by typing "Internet Options" into Windows 7+ start prompt.)
- Click the Security tab.
Click and highlight Local intranet.
- Click the Sites button.
Clear the hierarchical checkbox labeled Automatically detect intranet network.
Then set the three (3) checkboxes that immediately follow (as seen
below).
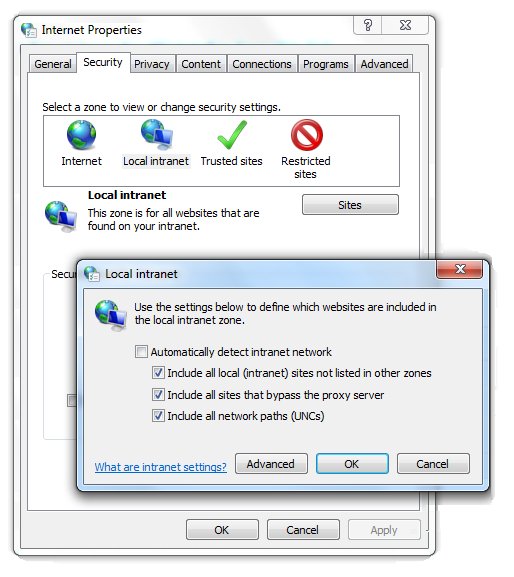
- Click Apply and OK until
your settings are saved. This should
disable the “Publisher Could Not Be Verified”
messages from appearing for that file type in the future.
If the messages persist, try this alternative:
- Click Start > Run and type "gpedit.msc". Click OK.
- Go to User Configuration > Administrative Templates >
Windows Components > Attachment Manager.
- Open the Inclusion list for moderate risk file types
setting.
- Set the policy to Enabled, then add “*.exe;”
to the Specify high risk extensions
box.
- Click Apply and OK until your settings are saved.
(Back to Top)
|
|
|
. How do I fix the "A Wireless Network Adapter Was Sensed"
message?
E-Z Schedule is not an HTML application. It is a
true database system and, as such, requires 100% connectivity to the
server. Any disruption in the connection during an update
operation can cause serious database corruption. If an
enabled wireless adapter is found, E-Z Schedule limits the
workstation to read-only access. You can correct this problem
easily as
follows:
|
(Back to Top)
|
|
|
|
|
|
 Your purchase
of an E‑Z Schedule Appointment Manager license entitles you to 60 days
of free technical support to help you get started. There is a nominal annual fee for
continued support after that initial period. Maintenance of
the support subscription entitles you to all standard application
updates at no additional cost.
Your purchase
of an E‑Z Schedule Appointment Manager license entitles you to 60 days
of free technical support to help you get started. There is a nominal annual fee for
continued support after that initial period. Maintenance of
the support subscription entitles you to all standard application
updates at no additional cost.


